Basic Console User Guide
You can use the Esc button to clear the console command line.
If you right click on a line in the console it will copy the line.
Tile Numbering
Tiles are assigned a number when the system is started. This occurs when the tiles are enumerated. The number represents the wiring order (physical location) of the tile. The tile number is used throughout system and is very important in troubleshooting.
A1 is always assigned to the first tile on the cable based on the setup data input, so each screen will be numbered based on how it's physically wired. During screen setup, the wiring pathway is also set so that the system knows which direction the cables are running (i.e. from bottom left, or from top right, etc.)
TNLs will display (in most cases) in title case but when entering as arguments in lua commands, you should always use lowercase.
Tile Network Location (TNL)
To identify individual tiles in the system, a unique number is generated based on the following naming convention.
Uppercase Letter
This represents the adapter which will always start with A. If there are multiple adapters for the screen, each will be labelled alphabetically. So the second adapter is always 'B' and a third adapter is always 'C', etc.
Lowercase Letter
This represents the strand that the tile is on which will always start with a. If there is only a single strand (which is typical in many cases), the strand will not be listed as part of the tile number at all, e.g. 'B4'. If there are multiple strands then the second strand is always 'b', and a third strand is always 'c', etc.
Number
The tile number is assigned based on how many tiles are on the strand, and the sequence in which they are wired.
For example, tile A8 is on the first adapter, where there is only one strand and it's the 8th tile on that strand. Tile Bb30 is on the second adapter, is on the 2nd strand on that adapter and is the 30th tile in that strand.
Tiles are grouped into Sections based on the adapter they are on.
Basic Tile Commands
Info Commands
| Command | Result |
|---|---|
| adapters() | Displays the list of adapters (NICs - Network Interface Cards) on the host PC and details such as IP address and submask, tiles and sections. Example: adapters() |
| errors() | Checks screen for errors Example: errors() |
| help() | Displays commands with parameters, namespaces and types. Example: help() |
| screens() | Dumps summary of screens to the console. Includes: Format, Gamma, Input, Sections (including wiring patterns and number of tiles). Example: screens() |
| sections() | Displays information for each section. This includes tile type, tile range, the screen names as well as the Wiring configuration. It also includes details about pixel format, proofs and information about how the wire order is physically cabled. Example: sections() |
| stats() | Prints basic health stats to the console (this is the same as the ? command).Example: stats() |
| tiles() | This displays the IP address for each tile and other status details |
For information about resolving errors and warnings, please see the Troubleshooting section.
Starting and Stopping
If you need to start or stop the screen display, use these simple commands.
| Command | Result |
|---|---|
| autoStart() | Will enumerate, then start, and retry forever if enumeration fails. If the screen is running, it will stop the screen briefly while it enumerates. |
| enumerate() | The process of tile discovery that shows a user which tiles are available. Nothing can occur on the screens until enumeration is complete. |
| start() | Start screen display |
| stop() | Stop screen display |
Brightness
During the set up phase, the target brightness (measured in lumens) will be set. The target is the absolute lumens it's attempting to reach. Or you can consider it to be the maximum brightness level the screen can achieve when displaying white and set to 100% brightness.
The target is not generally changed. The maximum level of light allowed is generally governed by the local regulatory body (i.e. the council may only allow certain brightness levels in certain areas of a city). At 100% brightness, this could be the equivalent of 6000 lumens during the day and about 200 lumens at night. It will vary based on the rules in the screen's location.
Brightness can be managed globally for all tiles in the screen, and it can also be adjusted on a per-screen basis. This might be done to account for the way the sun shines on the tiles as some may need to be brighter than others.
Sunrise Tracking
A screen can be set to automatically change brightness at certain times of day based on the sunrise and sunset times where it's located. Some screens may use a light sensor instead. This is primarily to avoid light pollution at night, and to decrease the brightness so that drivers are not 'blinded' by screens near roads.
If sunrise tracking is used, there needs to be a Day Target and a Night Target set as well. This defines the target for each time of day.
If the screen is not set to use sunrise tracking, it will display brightness at the level the target is set to.
Brightness Commands
These commands apply to the whole screen.
| Command | Result |
|---|---|
| screen.brightness(screen) screen.brightness(screen, brightness) | This is used to set or check the brightness, from 0-100%. The brightness is expressed as a ratio. Example: To check the brightness, use ? screen.brightness(1)To set the screen to 50% brightness, use screen.brightness(1, 0.5)To set the screen to 100%, use screen.brightness(1, 1) |
| screen.currentTarget(screen) | This is the target level the screen is currently running at. Example: To check the target that is currently set, use ? screen.currentTarget(1) |
| screen.dayTarget(screen) screen.dayTarget(screen, lumens) | This is used to check or set the target lumens for day time. This is relevant when Sunrise Tracking is used. Example: To check the day target, use ? screen.dayTarget(1)To set the day target, use screen.dayTarget(1, 3000) |
| screen.nightTarget(screen) screen.nightTarget(screen, lumens) | This is used to check or set the target lumens for night time. This is relevant when Sunrise Tracking is used. Example: To check the night target, use ? screen.nightTarget(1)To set the night target, use screen.nightTarget(1, 250) |
| screen.target(screen) screen.target(screen, lumens) | This is used to check or set the target lumens. This is the target lumens that will be used if the screen is not locked to sunrise/sunset or light sensors. See also: screen.targetLocked() and screen.useSunrise() in the Commands Section.Example: To check the target, use ? screen.target(1) To set target use screen.target(1, 200) |
| screen.useSunrise(screen, value) | Turns on or off sunrise tracking. This requires the screen number and either true (to turn on) or false (to turn off). Example: To turn on sunrise tracking use screen.useSunrise(1, true)To turn off sunrise tracking use screen.useSunrise(1, false) |
Colour Adjustments
The red, green and blue gain components can be individually adjusted. This should be done with caution and the gain components should be noted before making any changes so that you can easily change the settings back if needed.
| Command | Result |
|---|---|
| screen.blue(screen) screen.blue(screen, gain&component) | This is used to set or check the blue gain component used on the screen. The gain component is expressed as a ratio. Example: To check the blue gain component, use ? screen.blue(1)To set the blue gain component to 50%, use screen.blue(1, 0.5)To set the blue gain component to 100%, use screen.blue(1, 1) |
| screen.green(screen) screen.green(screen, gain&component) | This is used to set or check the green gain component used on the screen. The gain component is expressed as a ratio. Example: To check the green gain component, use ? screen.green(1)To set the green gain component to 50%, use screen.green(1, 0.5)To set the green gain component to 100%, use screen.green(1, 1) |
| screen.red(screen) screen.red(screen, gain component) | This is used to set or check the red gain component for the screen. The gain component is expressed as a ratio. Example: To check the red gain component, use ? screen.red(1)To set the red gain component to 50%, use screen.red(1, 0.5)To set the red gain component to 100%, use screen.red(1, 1) |
Screen Status
Through the console, a user can easily obtain a snapshot of data for a screen. Note that several of the figures may change regularly so a user can run this command several times in a row if they wish to track the fluctuations that are happening from moment to moment.
| Command | Result |
|---|---|
| ? | Returns high-level status information for screen. This command is a shortcut for stats() which can also be used. |
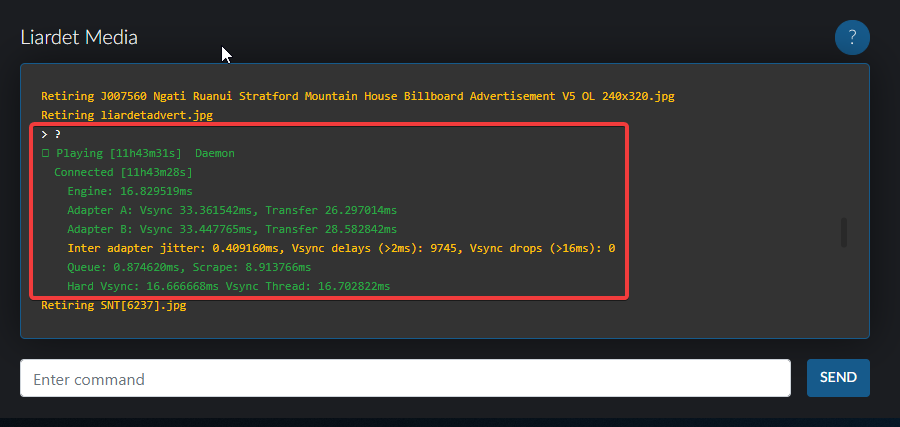
Here is an example of the details that are displayed.
Status Details
| Status | Explanation |
|---|---|
| Playing | The length of time the screen has been playing based on details taken from background processes. The time shown reflects the length of time since the previous outage. Note that an outage can be caused even by a Windows Update taking place. |
| Engine | This text will turn red if the figure becomes too high which will indicate that it's struggling to keep up with the frame rate. If it's consistently high, it may indicate that you need a faster PC to prevent frames from being dropped. |
| Connected | The length of time the screen has been connected to the internet. This will usually match the length of time the screen has been Playing. |
| Adapter A | Each network card will be listed as an adapter so if there are multiple cards, there will be multiples row of adapters named A, B, C, etc. See the example above which has two network cards. |
| Vsync | Vsync denotes how often the frame refreshes. |
| Transfer | The Transfer figure should always be less than the Vsync figure. If they are the same or within a few milliseconds of each other, it means it is struggling to keep up and frames are at risk of being dropped. The Transfer figure will change often which is a result of the way the data is set to flow at optimum rates for the space it's traveling. |
| Inter&adapter&jitter | A real-time measurement that indicates the time difference between each adapter sending the data. When multiple adapters are required (in cases where wiring may pose a challenge), they need to be synced as closely as possible to avoid a difference in display between the adapters. A 1 millisecond difference is very healthy and would not be visible in the display. If the difference is 10-20 milliseconds, it may start to be noticeable. |
| Vsync delays | The number of times that jitter is over 2 milliseconds during uptime. The delay number may be higher upon start-up while it's trying to stabilise the network and learn how quickly it needs to send data. The system uses an auto flow process to spread the network load so that data is delivered more smoothly across the required distance, preventing the buffers from overloading. |
| Vsync drops | This indicates the number of times a frame is not displayed. This number should always be zero. |
| Queue | The speed at which data is queued up to be sent. It typically relates to processor speed and should always be less than the Vsync time. |
| Scrape | The time it takes to rip information from the monitor to be sent to the tiles. Another method for obtaining this data is by using a Capture Device, in which case, the time is not displayed as there is no lag with Capture Devices. |
| Hard Vsync | The Vsync measurement from the hardware that represents the frame rate of the incoming signal. |
| Vsync Thread | The actual frame rate that's being internally generated. It's uncommon for the Vsync Thread to be higher than the Hard Vsync. |
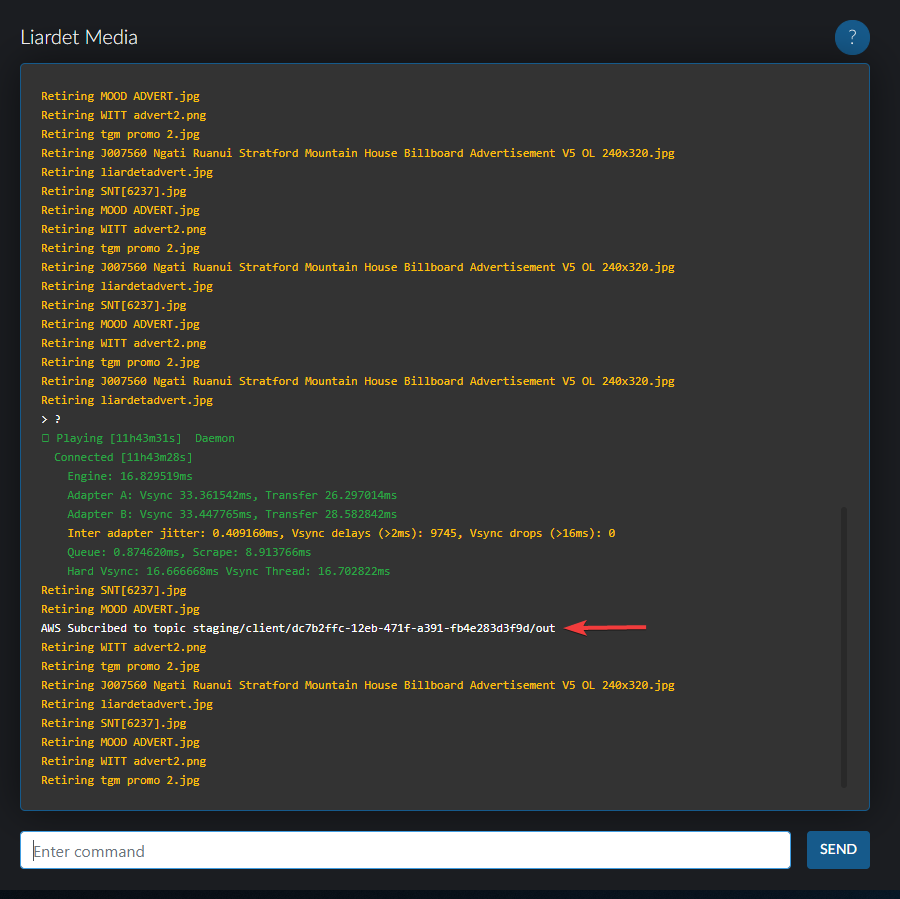
Update Stream
If the screen has multiple images loaded, there will be an update posted each time the image is changed. It will note the file name and that it's retired. These updates should be posted at the same interval as the Dwell time that is set on the image. The order of images shown should also match what has been loaded for the screen.
You will also see updates indicating "AWS Subscribed to topic....." and this is normal. It will occur when ON is being used to review statistics for the screen to indicate that ON is viewing the controller's broadcast.